


Roblox: The Ultimate Guide To Make Your Own Shirt
Roblox is one of the most popular gaming platforms for people who love to play games online. You not only get to play online games, but you also can create games for others. Well, the Roblox is considered to be the best online gaming platform for younger players. It gives them the chance to sharpen their creative side of their minds.
Do you know that you can custom make your avatar in Roblox? There are different outfits like pants, shirts, hats, and other accessories. If you want to modify the visuals of your avatar in Roblox, you’ll have to pay for the accessories in Robux. If you want to create your own Roblox shirts, pants, or other accessories and sell them to get Robux, you need to keep reading until the end.
Keep in mind that if you want to create your outfits for your avatar or even for selling purposes, you need to be a member of the Builder’s club. However, if you are not a member of the Builder’s club, then you are not eligible for making anything.
Below are a few simple steps to create a Roblox shirt on the most popular online gaming platform “Roblox”.
How To Make a Shirt On Roblox:
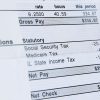
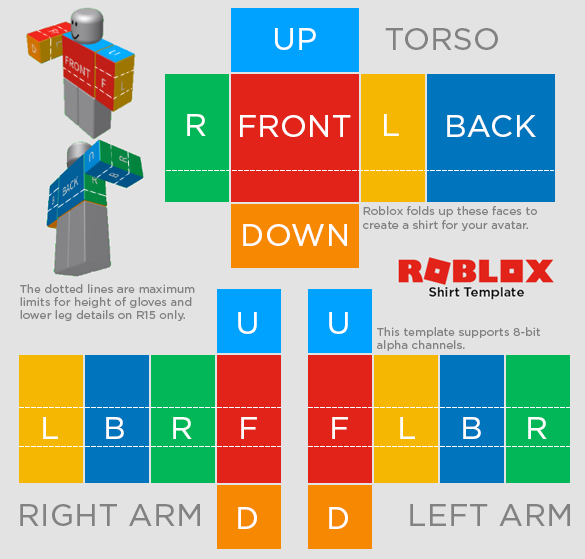
When it comes to creating Avatar’s outfit, you can easily download the different templates that are readily available on the Roblox platform. All you need to do is pick up your favorite template, and get on with designing your shirt.
If you want to create a shirt, you need to follow the below-given steps:
- As mentioned before, you need to be a member or the Builder’s club in order to make a shirt. So, if you are a member then head on to https://static.rbxcdn.com/images/Template-Shirts-R15_04202017.png on your internet browser.
- Whereas, if you want to create a shirt on Roblox without any template order, then you need to navigate to http://wiki.roblox.com/images/d/d5/Template-Transparent-R15_04112017_V2.png on the internet.
In order to save the template, you need to right-click on the template and save it.
What next? You need to open the shirt template in the image editing program. You need to search for the best free image editor because you do not want to waste money on creating a shirt for virtual games, would you?
The next move? Click on the Edit option and then get creative with designing the shirt as per your imagination.
Once you’re done with the editing, it is now time to save the shirt. Just press CTRL+S or Command+S on your keyboard (both commands are different, one is for Windows the other is for Mac Users).
And there you have it. Making your own custom shirt on Roblox is done and dusted.
But, now that you’ve created a shirt, you also have the option to sell it for a few Robux.
Made A Custom Shirt? Now Upload It
- Firstly, you need to need to go Roblux.com/games on your internet browser and then click on the Create option.
- Click on the option where it is written: “Continue to create page”.
- If yet you have not logged in to your account, you need to enter your username and password.
- Hence, a new page will open. Click on the “My Creations” and select the shirts option.
- You’ll see a “Create a shirt” page. You now need to click on the “Browse” option and you’ll see a new page opening.
- Select the shirt image and click “open”. Change the shirt name in the given text area.
- Now upload the shirt. The upload option is just below the shirt name text field.
Conclusion
Well, this is it. This is how you will be able to create a custom shirt on Roblox and also sell it in order to earn some Robux. Keep in mind that your shirt will first be approved by Roblox. Later you can modify the visuals of your avatar. However, without the approval of Roblox, you can’t even apply your own created shirt to your own Avatar.


